This was my first time making soft leather. I began this process in the late winter. I finished processing the skins into soft leather in the spring. I put in about a week and a half of work into making a couple pairs of moccasins in late spring.
I tried skins from three types of animals: goat (4 skins), cow (1 skin) and horse (parts of 2 horses). I was able to make a soft leather from the cow and goat skins but I was not able to produce a soft leather from the horse skin due to it´s inherent properties. From the two horse´s skins that I tried, I could only make rawhide.
BASIC PROCESS
The basic process that I used was a combination of both the ¨wet scraping¨ and ¨dry scraping¨ approach. I understand that it is a bit unorthodox to combine the wet and dry methods but this seemed to make the most sense to me:
- Soak the skin in a creek for a couple of days (if the skins are dry), so that they are pliable.
- Then soak the skin in an ash and water mixture until the hair will pull out (typically about 2 weeks). The ash loosens the hair.
- Wet scrape the hair/epidermis side to remove the hair. Flip over and scrape the inside ¨flesh¨ side to remove some of the membrane.
- Rinse skin in creek to wash off ash.
- Frame skin to stretch and dry.
- Scrape and sand while framed. Remove external skin membranes on both sides of the hide.
- Soak the hide in brains overnight.
- Work the hide around a tree or a smooth wire fence. Spot sand.
- Repeat the brain solution soaking and working of the hide until soft. Do this at least 4 times.
- Smoke the skin using punk wood.
POST OVERVIEW
I´m not going to make this an in-depth ¨How-to¨ instructional on making soft leather. That has been done by others. See these books and videos for suggestions. I will instead show photos of my process and personal experience.
There is also a ton of online videos on the topic.
Unfortunately, I did not have access to those books or online videos at the time I learned the process. Instead I relied on a assortment of articles that I found in the estancia library:
Braintan Buckskin. I had a pamphlet version of the first chapter of the book: Primitive Wilderness Living & Survival Skills by John & Geri McPherson. This was my primary source of information on the process.
The Bulletin of Primitive Technology, Issues 4 and 7
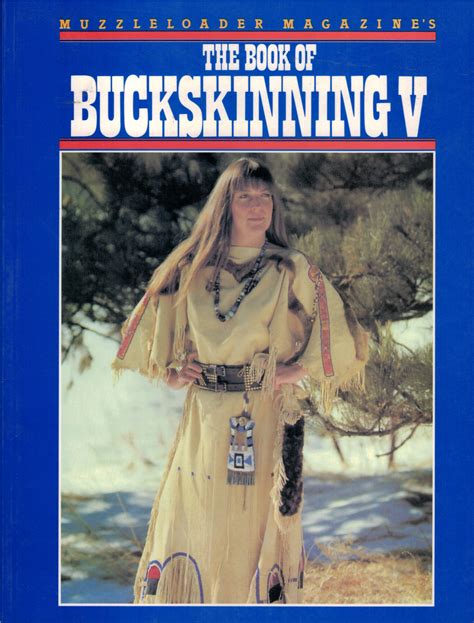
The Book of Buckskinning IV by William H. Scurlock (Editor)
Foxfire 3 (The Foxfire Series #3) by Eliot Wigginton
The Ways of My Grandmothers by Beverly Hungry Wolf
Complete How-To Book of Indiancraft : 68 Projects for Authentic Indian Articles from Tepee to Tom-Tom by W. Ben Hunt
I put all of that reading material together with my memory of some hide work that I had seen done on two occasions 20 years prior. So I was learning from memory, the sparse reading material and intuition.
At the end I will include some pattern information for making moccasins and stitching techniques.
PROCESS

Dry goatskin. This is what I started with in most cases. The skin was dried by being slung over a fence to dry in the sun. In arid climates this works well. When I had a fresh skin I put that directly into an ash and water mixture.

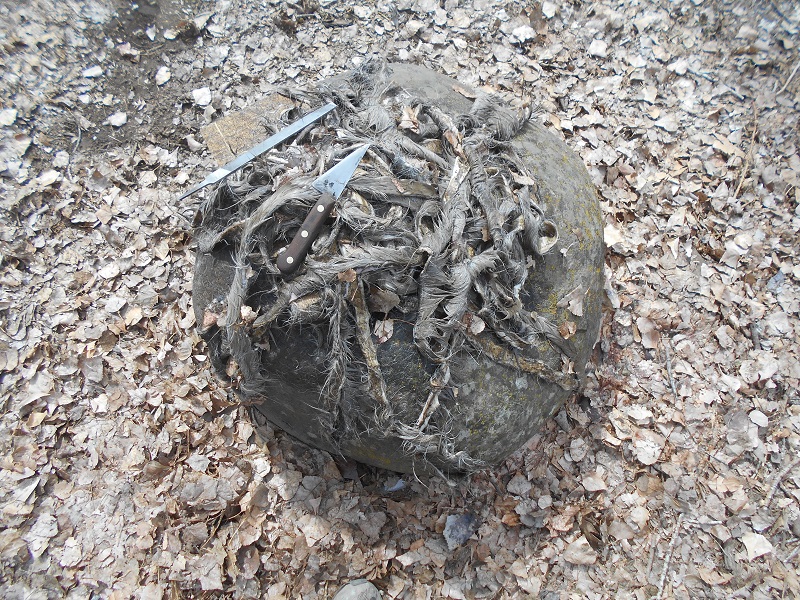
Several skins that are soaking in the creek to make them soft. I used rocks to weigh down the skins. I had wild dogs take off with some of the skins. So try to put your skins further from the shore and deeper into the water to deter theft. Or use a tub inside (or covered) where you can protect the soaking hide from animals.
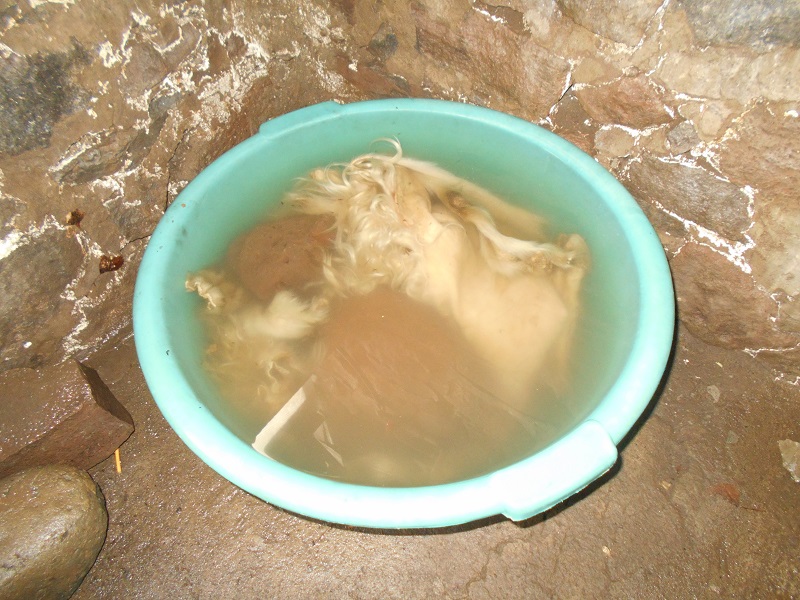
Soaking goat hide in tub. Weighted down with rocks. Alternative to using the creek. I changed the water daily in most cases.
Cow hide is covered in wood ash before being rolled up and put into the green tub with water. I would try to get at least a two inch thick layer of ash on the fur side, more if available. The lye in the ash is used to loosen the hairs for wet scraping later. The ash also makes it less appealing to animals if you have hungry critters to watch out for.
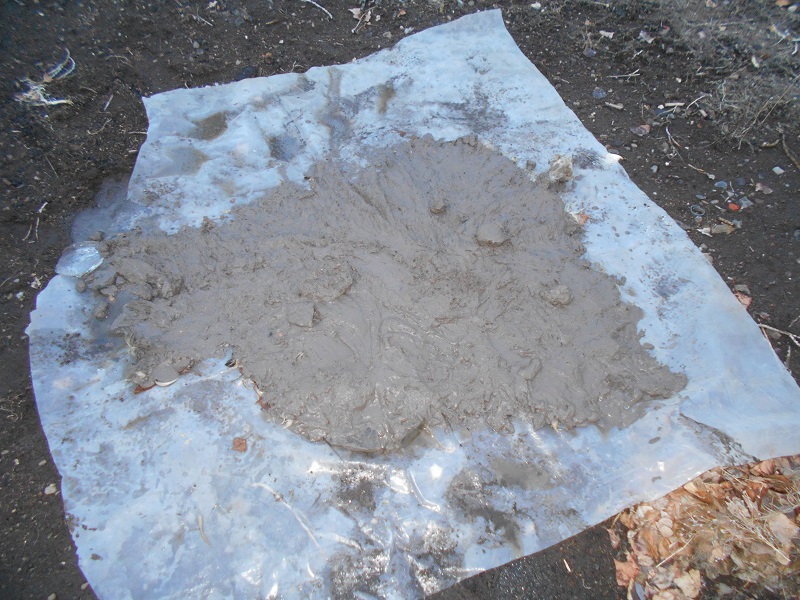
Ash is wetted before being rolled up.
Goat skin that is rolled up after a thick ash slurry has been applied to the hair side.
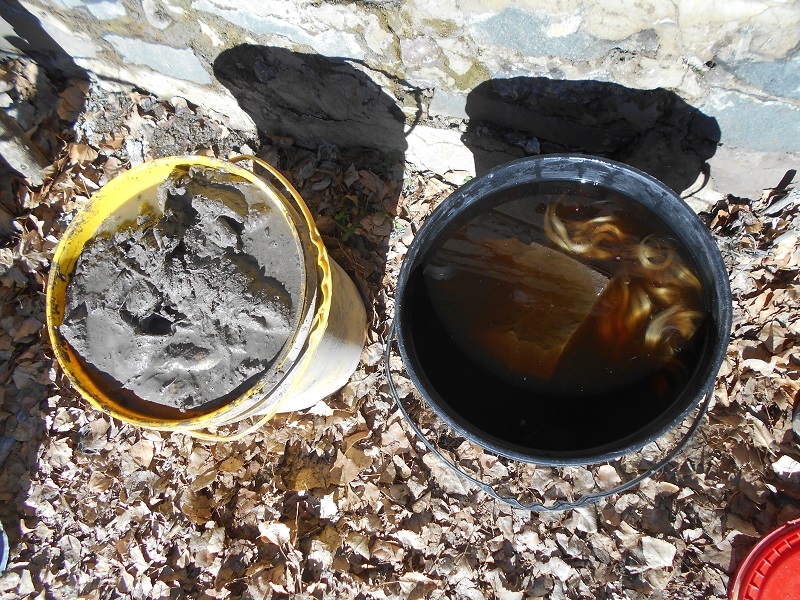
Two goat skins in buckets. After being rolled up with wet ash, the skins are placed into a container to soak. In the bucket to the left I used ash, and in the right bucket I tried lye water. I thought the ash worked better but this would depend on the concentration of your lye. My lye was weak. Weigh down skins with rocks to keep them submerged.

After soaking this goat skin in the ash soup until the hair pulled out, I laid out the hide on this smooth log. Then I wet-scraped the hide with a dulled draw knife tool. The draw knife is resting up against the tree trunk in the photo. I used the sharp side of the draw knife at roughly a 90-degree angle. I would press my chest up against the hide that is draped over the top of the angled log. Then I would place the draw knife on the hide close to my chest and push down along the log, scraping the hide with each stroke downward. The log was propped up against a tree stump at an angle. A crotch was cut into the trunk in order to keep the angled log from moving. The bottom end of the log was buried, weighed down with rocks, and pinned down with stakes to keep it in place. The green tub in the background has more skins soaking in ash soup.

Picture of the cow hide in a creek. It is tied with a blue cord to a tree. It is being rinsed of ash after being wet scraped. I left it in the creek for a day.

After the hides have soaked in the creek to wash out the ash for a day or two, I prepared the skin for framing. I cut off the legs and other parts that stuck out. By squaring off the hide I found that it was easier to frame and work on the frame. In the photo I placed this goat skin on a board and cut off the irregular parts off with a knife.
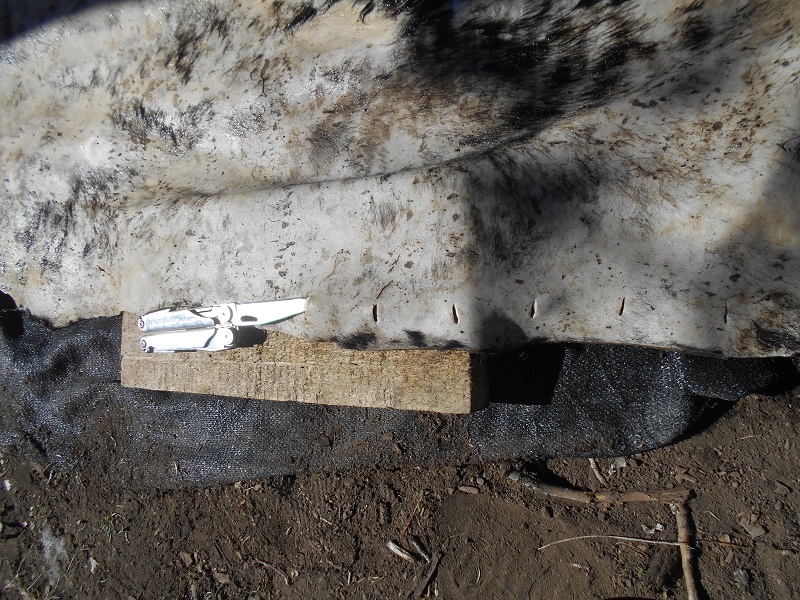
I used my Leatherman knife tool to cut the holes in this cow hide. I pointed the blade inward with the hope that cutting this way would reduce the number of holes that tear through during stretching. The holes were placed about 1.25-inches in from the edge and about every 4-inches along the perimeter. I made the cut by placing the wooden board under the skin, stabbing the knife through the skin into the board, then pulling the skin up along the blade while applying downward pressure to the knife. I used this knife because it was sharp and had a fairly uniform ½-inch wide blade which made nice uniform holes.
Here is the cow skin with long branches laid out around it. I tried to leave about 1.5 feet of space between the frame and the skin to allow space for stretching of the skin and adjusting the tension.
I did not have any more rope or strings, so I used scrap skin strips to hold the frame together.
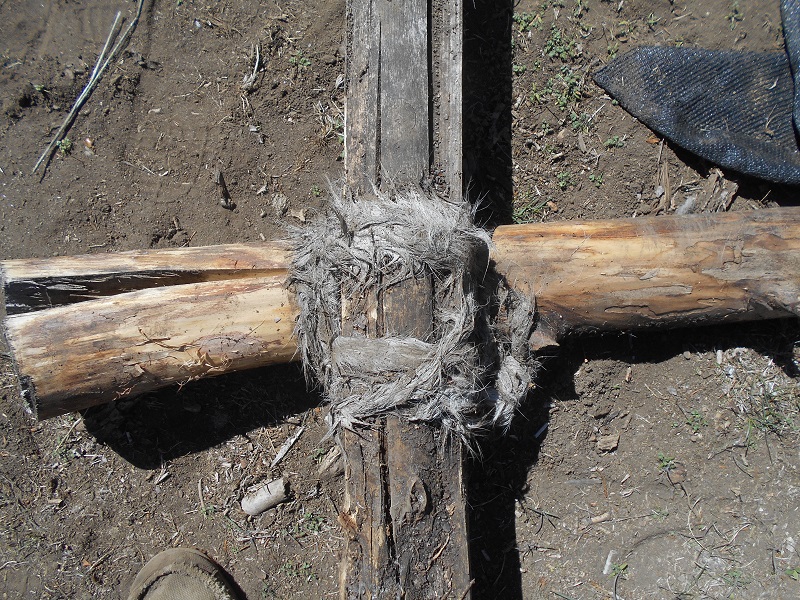
The corners of the frame were lashed together with strips of wet skin. The strips dried hard.

Cow hide framed and leaning up against a tree to dry.

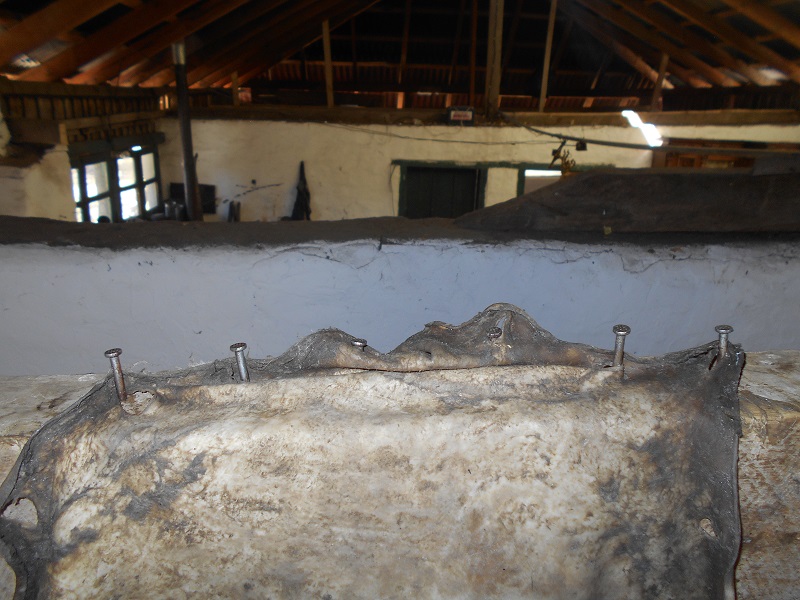
Hide nailed to the wooden wall of the house. I tried this as an alternative to the pole frame. I tended to stretch skins pretty tight as I added each nail with this wall method. I found that as the skin dried it was stretched much more than using a frame. For a thick skin like cow this might be desirable. In this case I found that it made the goat skins too thin and when worked during the braining and drying process, the thin goat skin tended to tear or develop holes more easily.

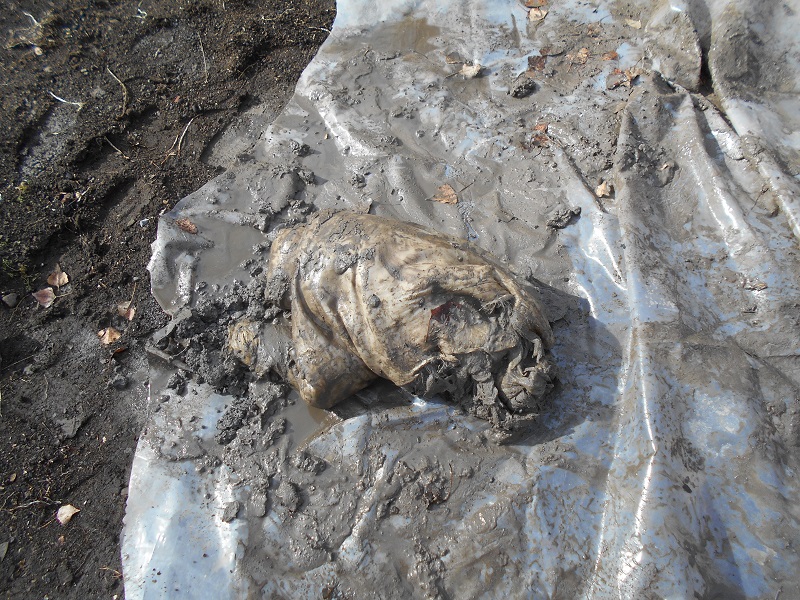
This is horse skin. There was a patch of hair that was difficult to remove during the wet scrape process. I later removed the hair by dry scraping once the skin had dried into rawhide.
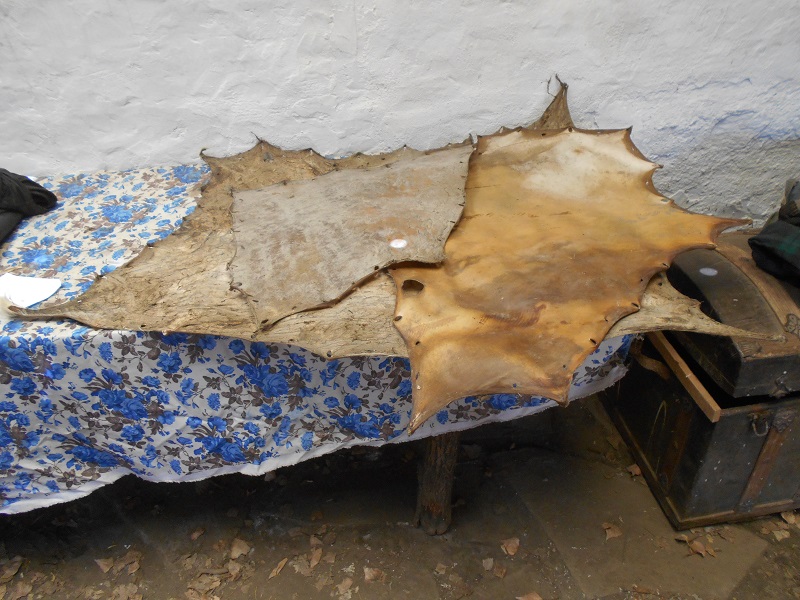
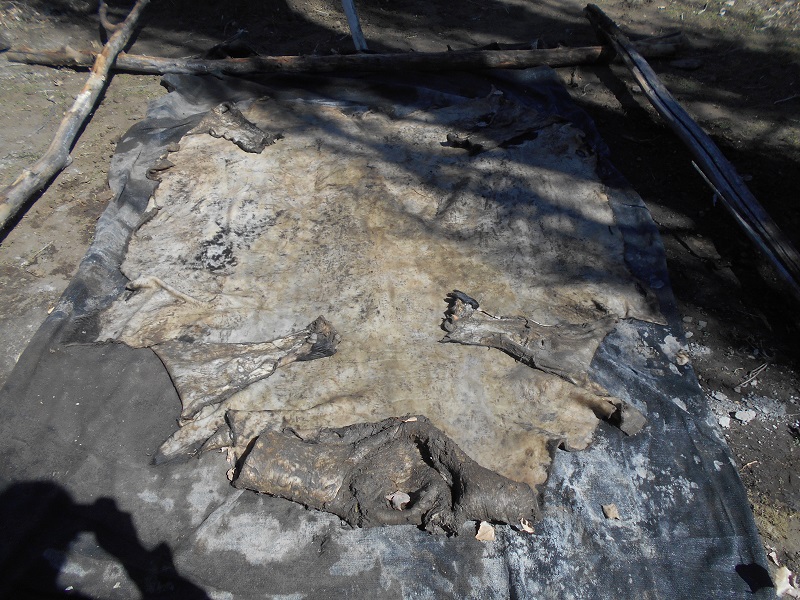
Rawhide skins after drying on the wall. Nails were removed and the skin was taken down once dry.
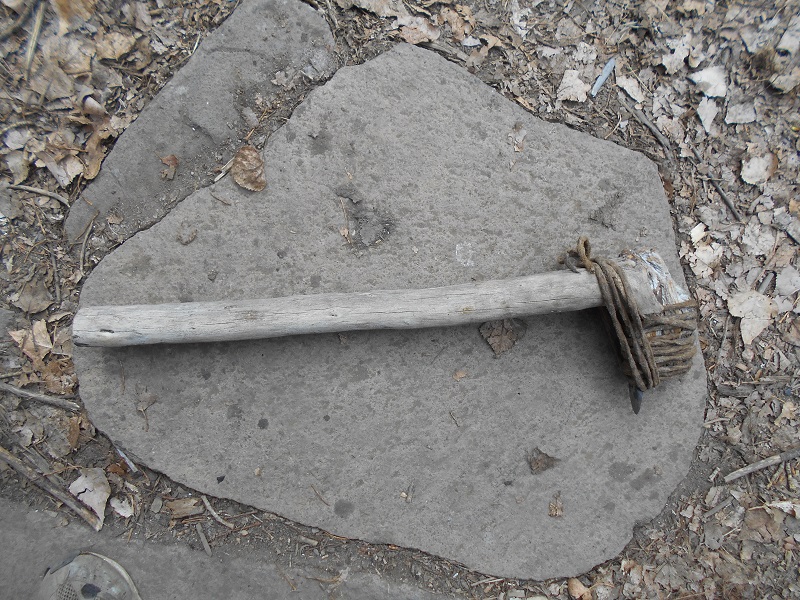
I made a scraper from an ¨L-shaped¨ piece of wood, an old straightened horse shoe from the blacksmith shop and a length of leather rawhide cord from a cow.
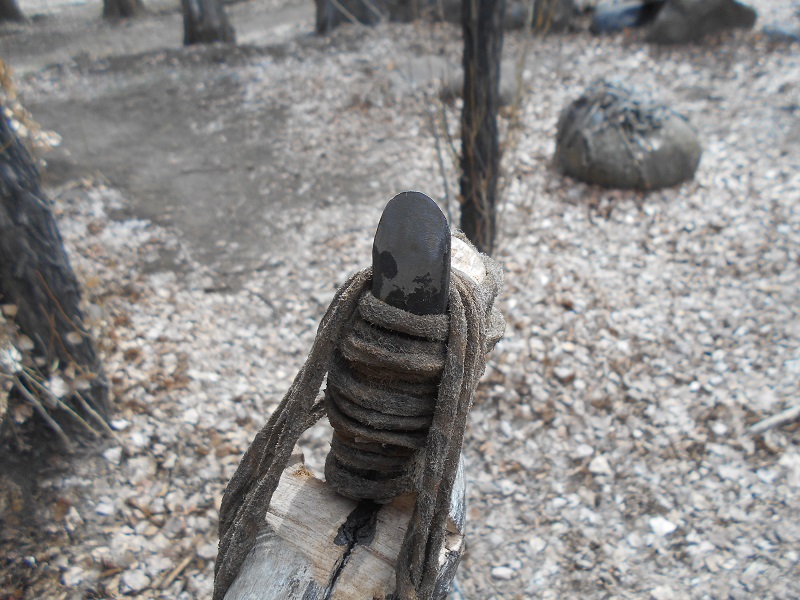
Here is a close up of the sharpened horse shoe bit lashed to the wood handle.

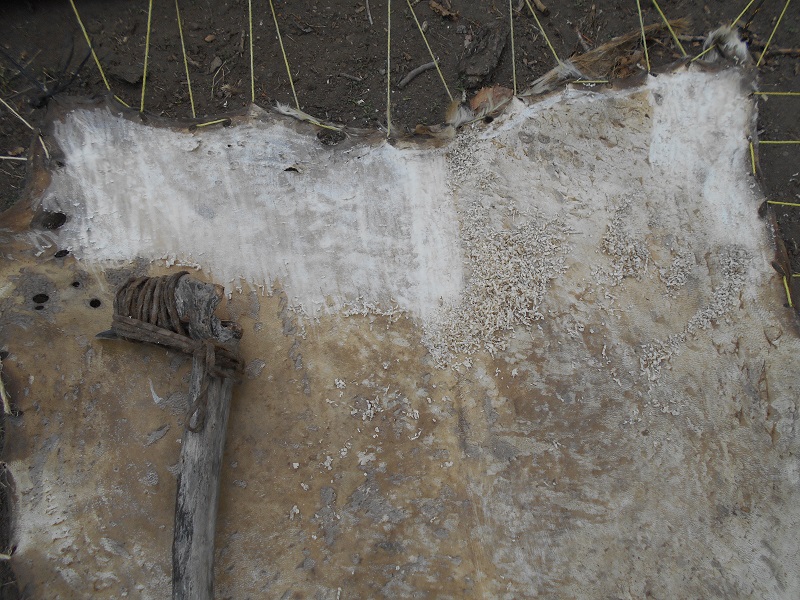
Picture of the cow hide being scraped. The lighter colored upper portion has been scraped. I also sharpened a gardening tool to use as a scraper. This actually performed better than my horse shoe scraper. The horse shoe metal was softer and needed to be sharpened much more frequently with a file.
Scraping of the epidermis and ¨scarf skin¨ on a goat. This is the fur side.

Ground scraping of a goat skin that had been nailed to a wooden wall (or possibly removed from a frame). I tried this instead of the frame. I did not have a strong preference for either method (frame or ground scraping), but if a rock was underneath the skin on the ground it could cause a tear as the scraper passed over the part of the hide where the rock protruded. So I had to be careful to work on a clean surface when scraping on the ground.
Note: I tried to make hide glue from the skin scrapings. It never worked. I believe that this was from soaking the hides in the ash. The lye in the ash probably broke down the proteins used for making glue. If you want to make hide glue with your skin scrapings, then I would just do the dry scrape method outlined in John & Geri McPherson´s book mentioned above. Skip the ash soak step.

This is a goat hide that was tacked to the wall. After taking it down and dry scraping, I followed up with a sanding. I used a chunk of abrasive concrete for sanding. I put a towel on the ground and placed the skin on top of the towel. Then I sanded the section over the towel.

Different chunks of concrete that I found around the foundation of the house to use for sanding. I did not have good sand stone in my area so the concrete chunks provided an alternative.
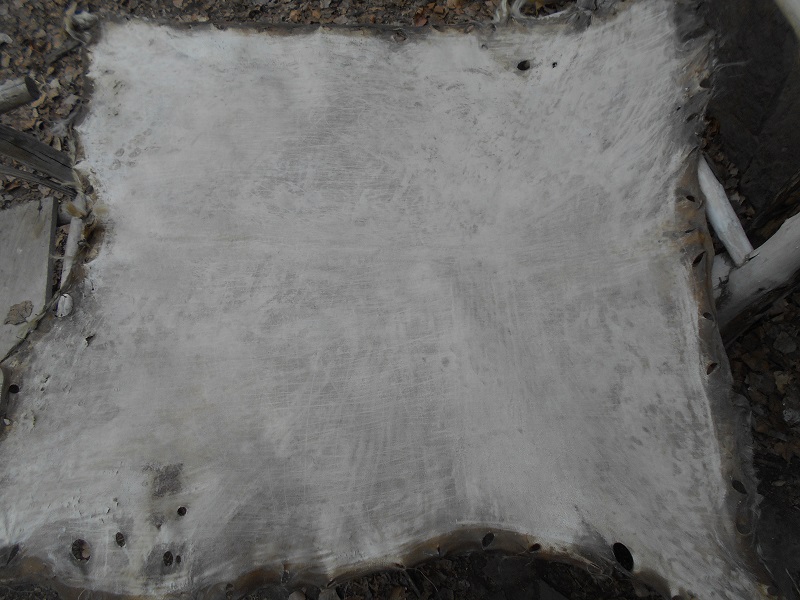
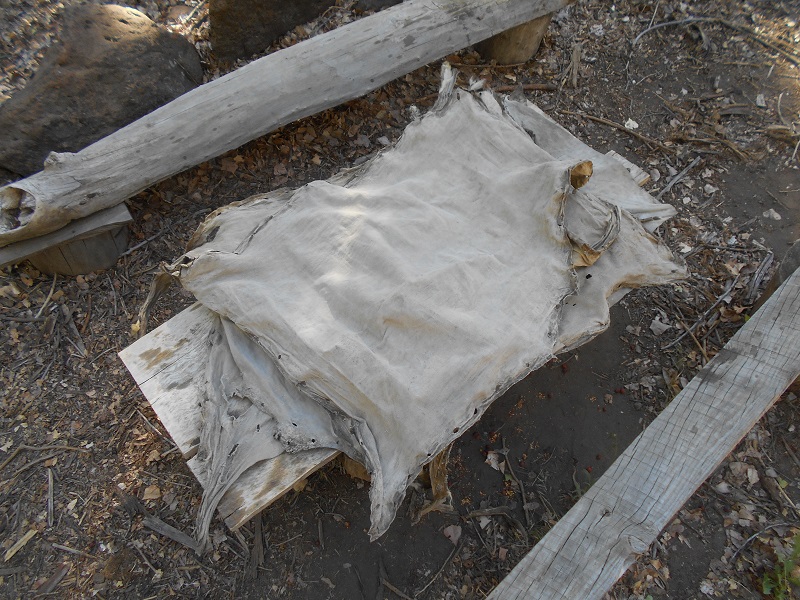
This is a goat hide that has been dry scraped and then sanded once.
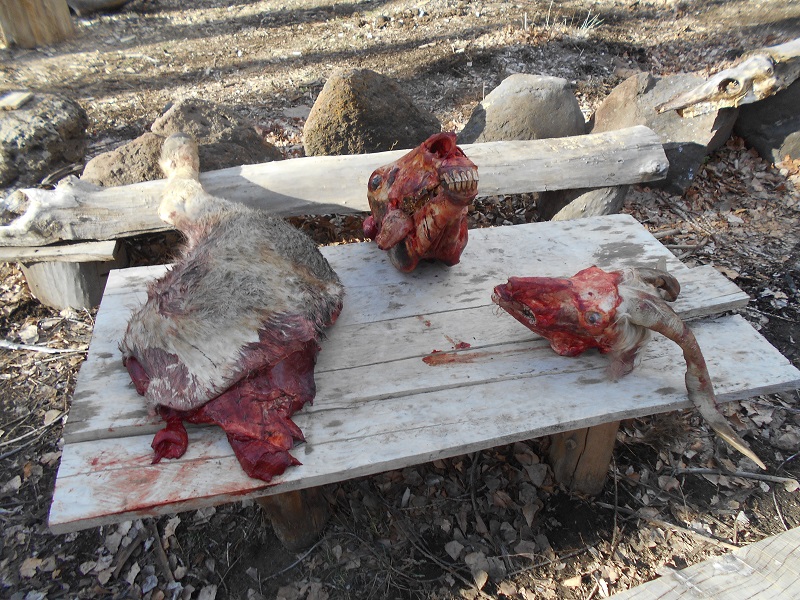
Horse and goat heads to extract brains from for softening the hides.

I used a hatchet to open the skulls and get access to the brains.
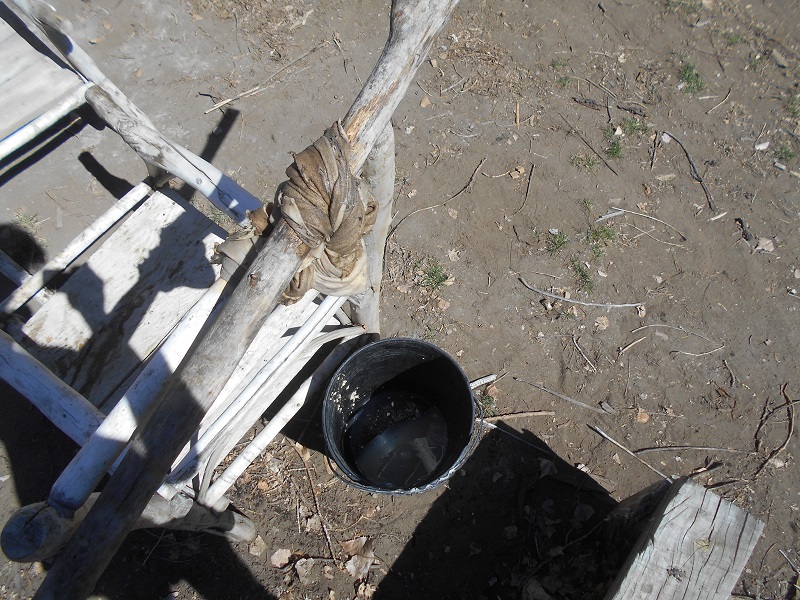
After soaking the skin in a boiled water and brain solution, I am squeezing out the liquid prior to working the hide as it dries. I draped the hide over the top bar of the chair. Then I rolled up the skin hanging below the bar with a wooden pole and twisted the drippings into the bucket (to reuse for further soakings).

Because I decided to leave this cow hide on the frame to be brained and softened initially, I applied the brain and water mixture with the paintbrush from the pot. I rubbed in the brain mixture with the smooth stone as I sat on top of the cow skin.
This was a different way of applying the brains, an alternative to soaking the skin in a bucket of brain solution overnight.

After many days of trying to brain and work the whole cow hide in the frame, I decided to cut it into 3 separate sections to finalize the braining and softening process. I used the red handled metal snips featured in the photo to cut the thick cow skin. In the lower right is a goat skin for size comparison. The goat skin was a nice size to work with.
I then started to soak the three smaller cow skin pieces in a brain solution and work them like the goat skins. I did not like trying to soften the cow skin in the frame. It was difficult to work.
After squeezing out extra liquid I tried stretching this goat skin by putting 6 nails in a line on top of a house beam. Then I used the holes along the perimeter of the hide to hook over the nails. Then I stretched the skin a few times by using my body weight to hang on the hide. Then I would rotate the hide and stretch again, continuing until I worked my way around.
Close up of how the hide was hung.
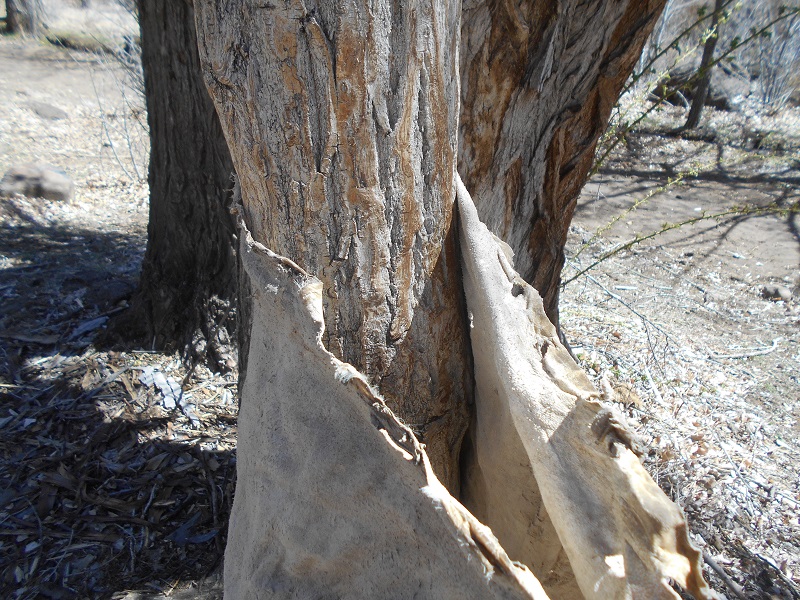
I eventually abandoned the beam stretching in favor of ¨tree rubbing.¨ This a poplar tree. I would take the skin and wrap it around the tree. Then I would pull the drying skin back and forth across the tree trunk. This process had a sanding, stretching, and drying effect on the skin. In order to keep the skin soft and pliable it is essential to keep working the hide until it dries.
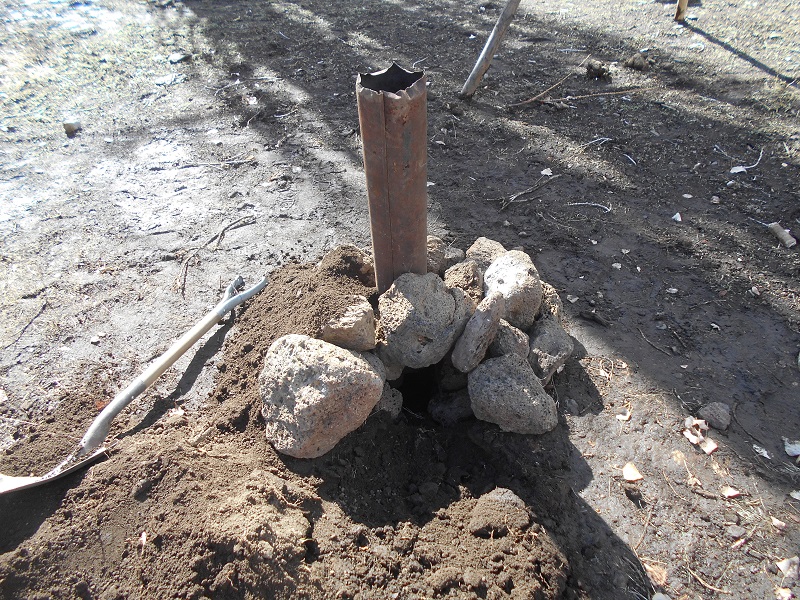
This is the smoker under construction. I dug a pit and supported a section of old stove pipe with horizontally laid rebar, keeping the pipe above the bottom of the pit. I then piled up rocks around the pipe. Then I covered the rocks with soil. I was advised to use porous lava rock. I suspected that this type of rock would explode when exposed to flame because of the trapped air. It did. The advice was bad. But it worked anyway because the soil layer buffered explosions.
The smoke is used to coat the fibers of a softened hide to help the leather stay supple and soft after getting wet. If you skip this step, your leather will harden when drying.
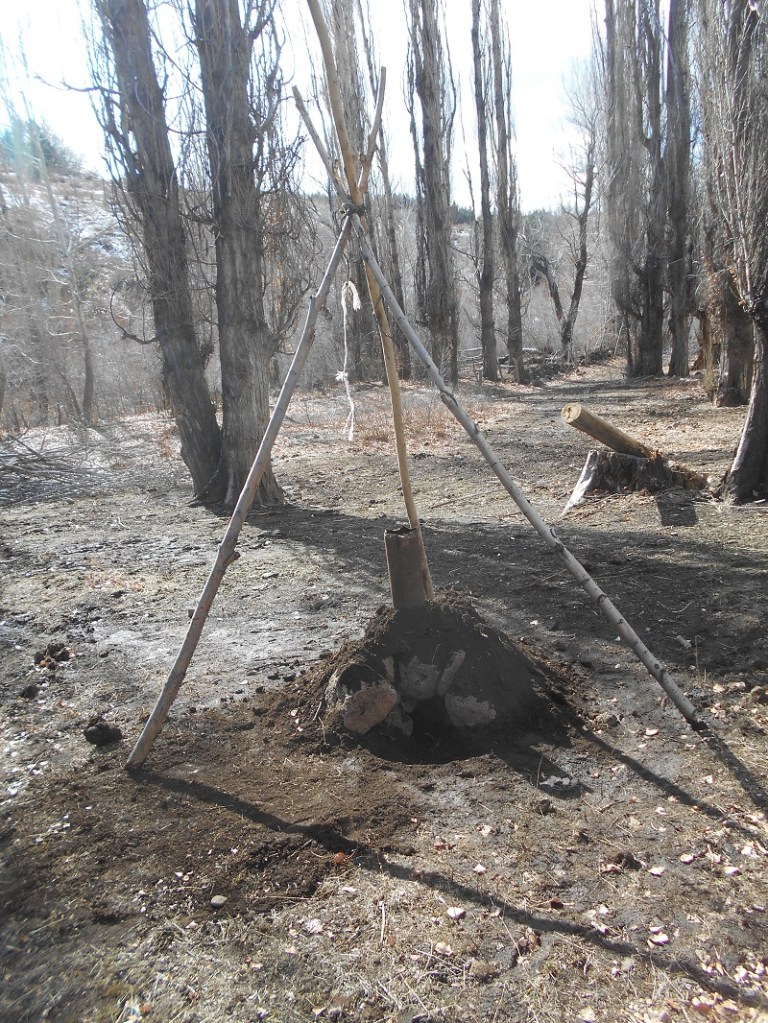
Finished smoker with tripod above for suspending the hide.
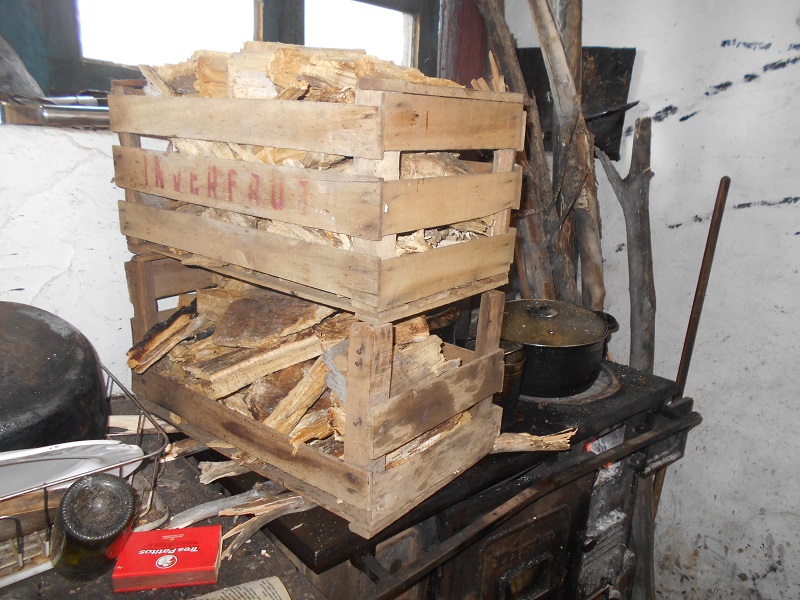
Double stacked wooden boxes of punk wood drying on the wood stove. Punk wood produces a lot of smoke when burning and is a commonly used material used for smoking leather. It was winter time, so the punk wood was too moist and required drying.
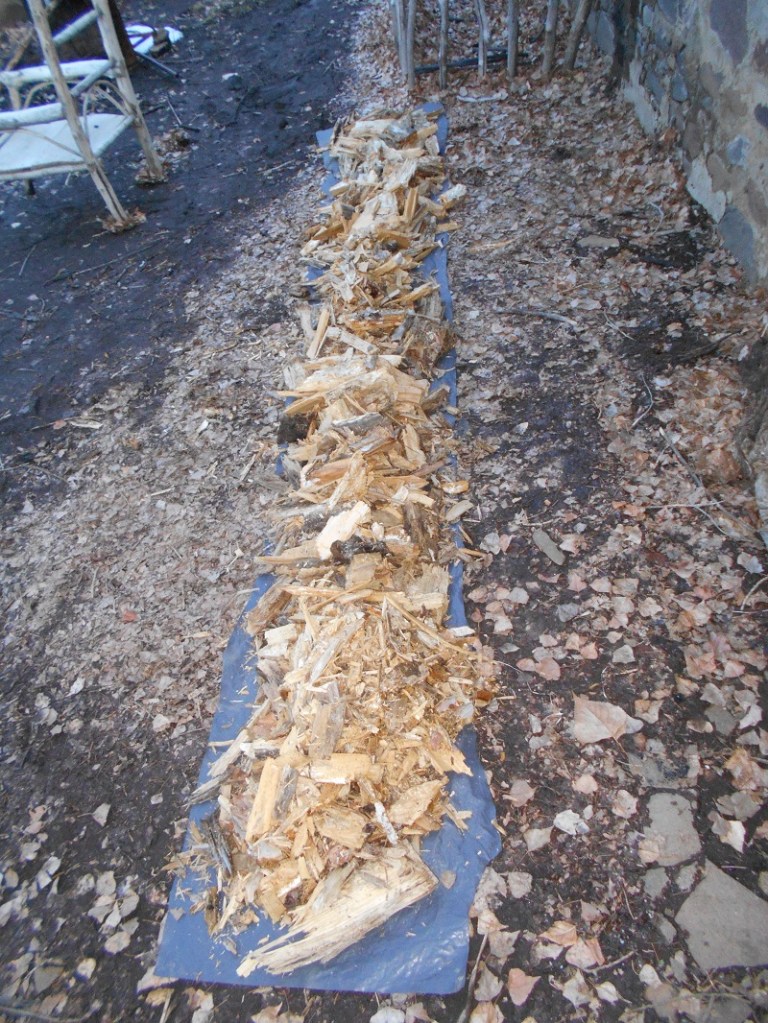
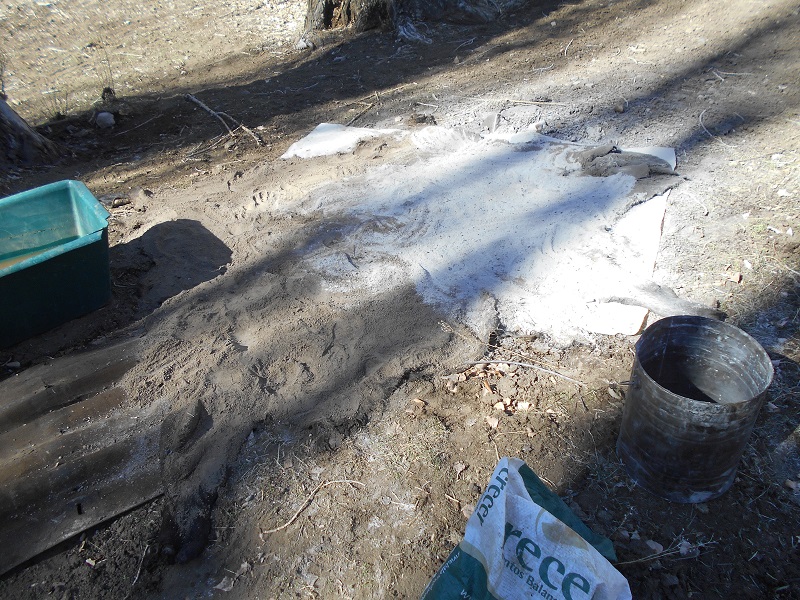
The punk wood was laid out on a tarp on sunny days to dry out.
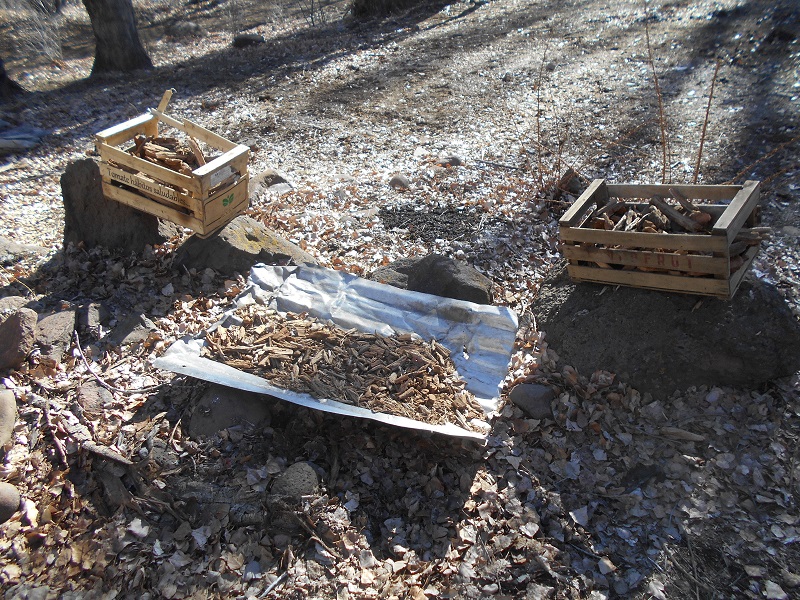
Punk wood in wooden boxes and on a scrap piece of roofing set in the sun to dry.

Here I am starting the fire to build up a bed of hot embers.
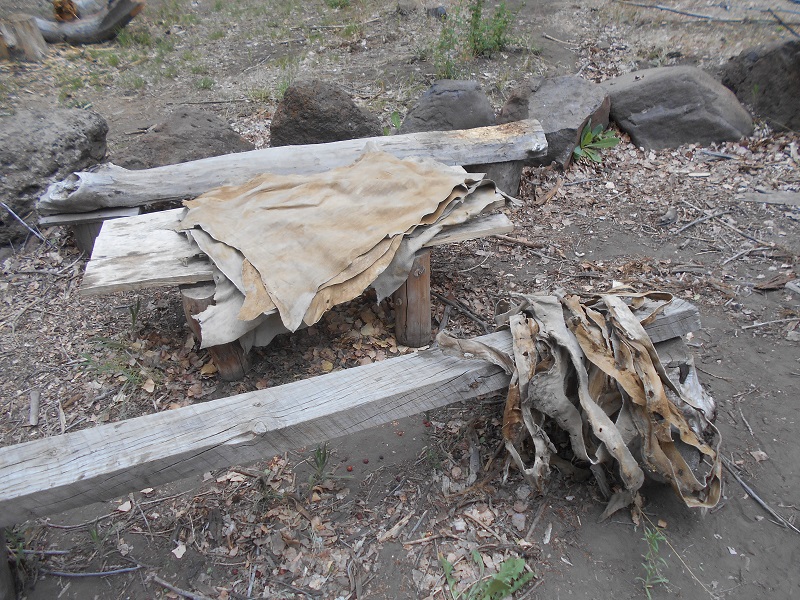
This is a stack of brained and worked soft goat hides, ready for smoking.
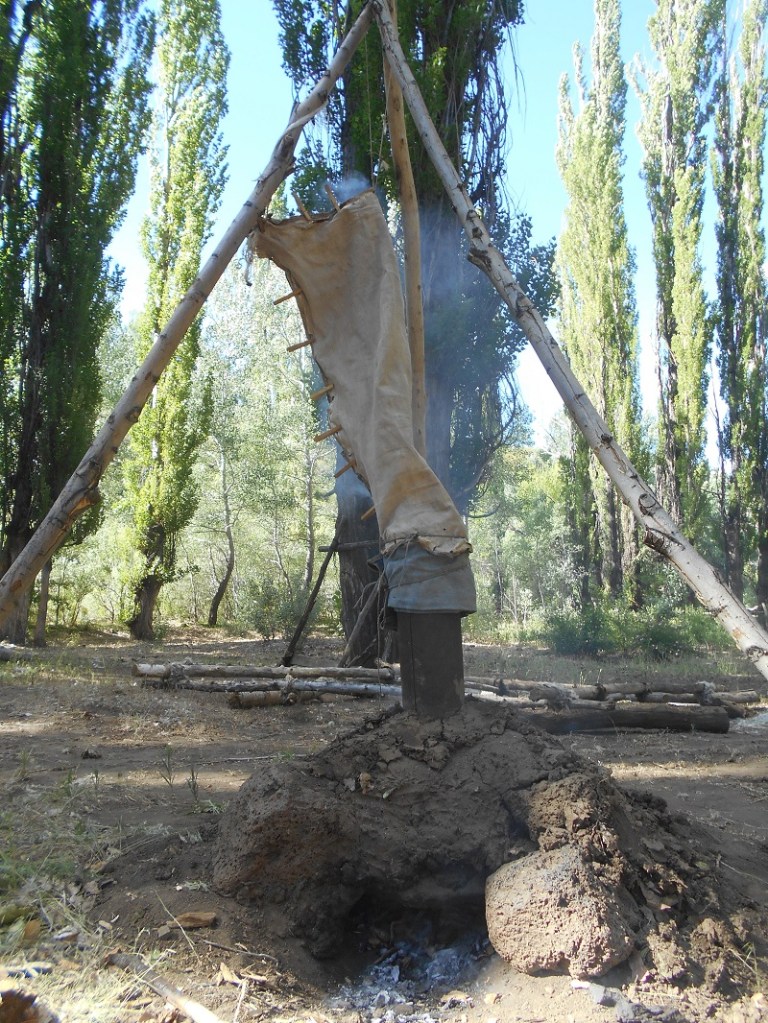
A goat hide being smoked.
After a nice bed of coals was ready, I fed in punky wood to generate smoke. You want to keep the fire low and prevent it from getting too hot. Ideally you can avoid flames and instead just have smoldering punky wood.
The hide is suspended from the tripod. I used some old ripped jeans to wrap around the stove pipe to protect the skin from burning. I used clothes pins to hold the hide closed, leaving a hole for the smoke to escape.
After the skins are smoked, I cut off the perforated perimeter. The perimeter strips make good tie straps. I smoked the skins for about 25 minutes per side. I would have liked to have done it longer but I only had one day to smoke all of my hides as I was leaving the estancia the next day.
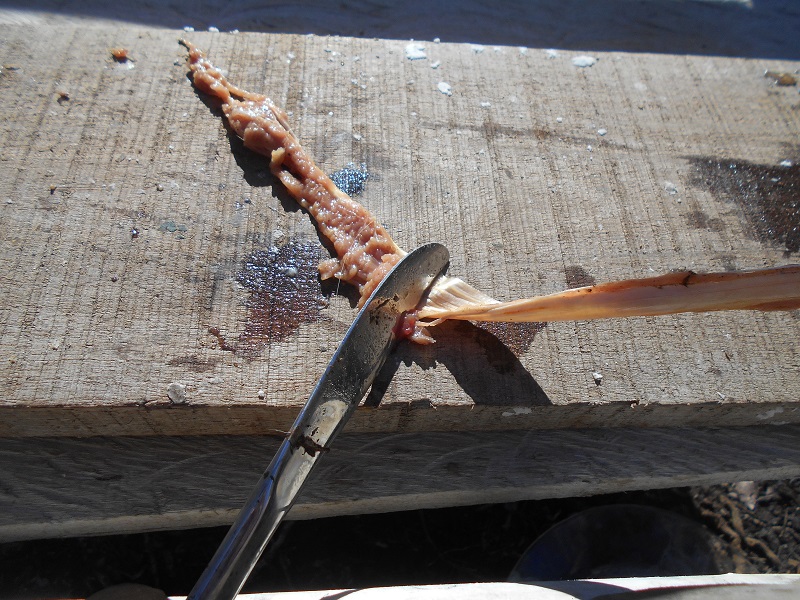
I am using a butter knife to clean the sinew. Meat is scraped from the sinew by placing the blunt side of the knife down on a wooden board, pinching the sinew. Then the sinew is pulled between the knife and board.
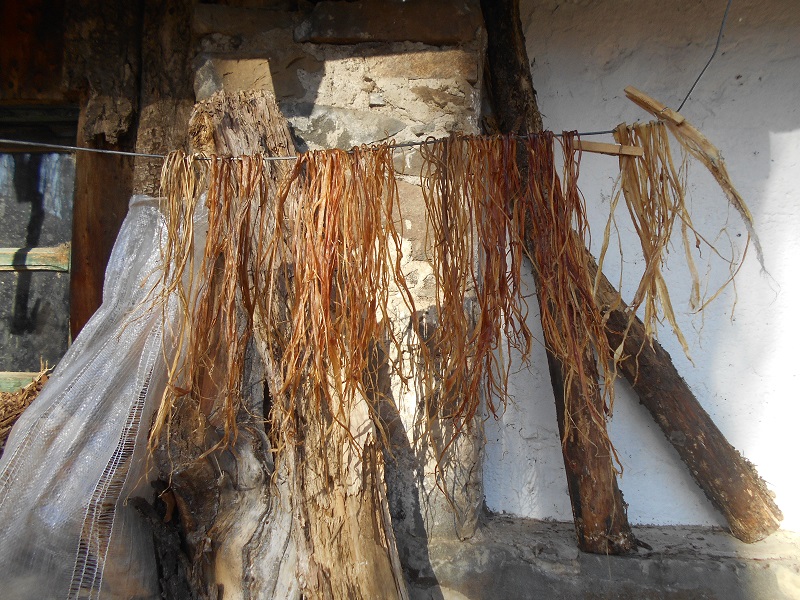
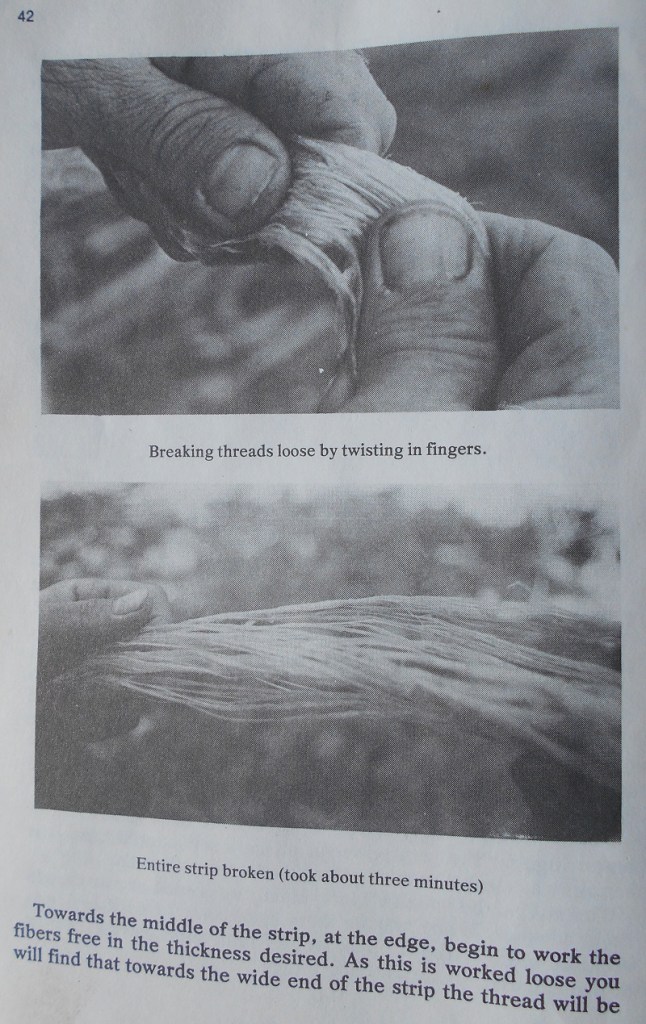
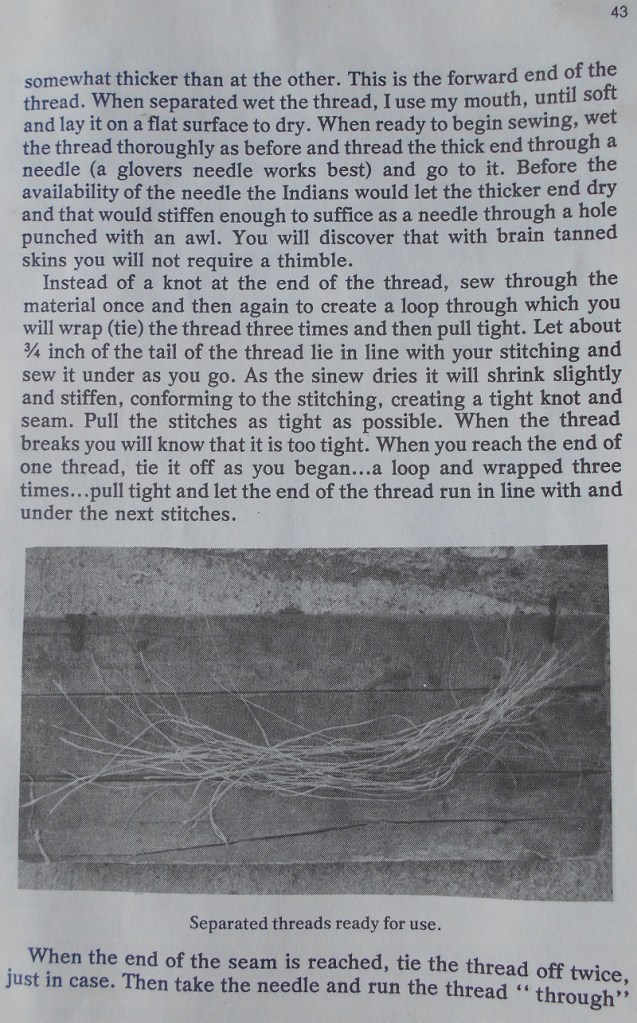
This is mostly horse sinew harvested from along the spine. This was taken from the scavenged horses that I mention in my prior blog post: Corona Virus? What’s that?… My time in the Andes Mountains During the 9 Month Argentine COVID Lockdown. There is also some goat sinew that is pretty short to the right of the picture. It is drying on a wire in the sun. Instructions for harvesting sinew follow… [excerpts from Primitive Wilderness Living & Survival Skills by John & Geri McPherson]


MOCCASIN PATTERN
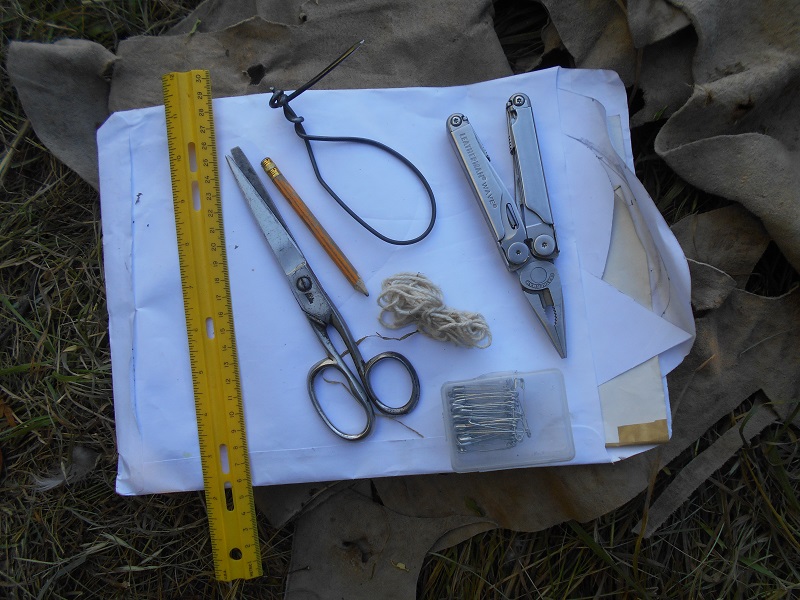
The string is used to get the circumference of my foot or take other measurements.
The ruler is used for drawing the pattern.
The safety pins were used for cloth patterns that I made from spare sheets. I held the pattern together with the safety pins and put the cloth pattern on my foot. Then I made adjustments to the paper pattern based on the fit of the cloth pattern. I made a cloth pattern to test the pattern before I started to cut the valuable leather to make a final pattern.
The pencil was used for drawing the pattern on the paper and leather.
The scissors were used to cut the paper and leather.
My awl was a piece of twisted wire fence. I sharpened the tip. The Leatherman pliers were used to pull the sinew through the leather during stitching.
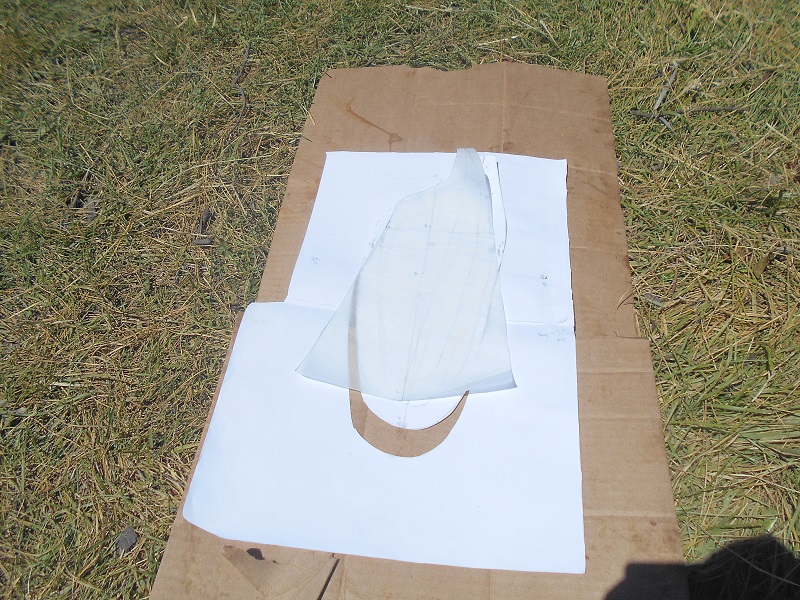
Making a pattern. I used both tracing paper and standard paper.
The book in the photo above is one of the sources for my patterns.
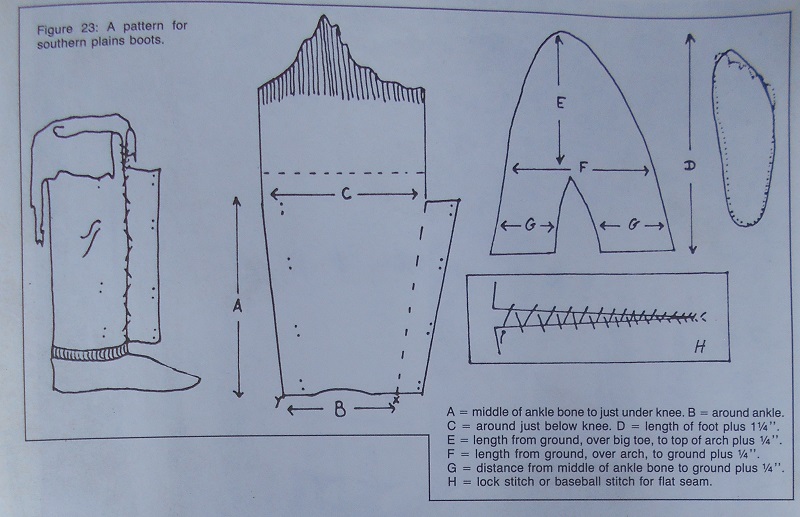
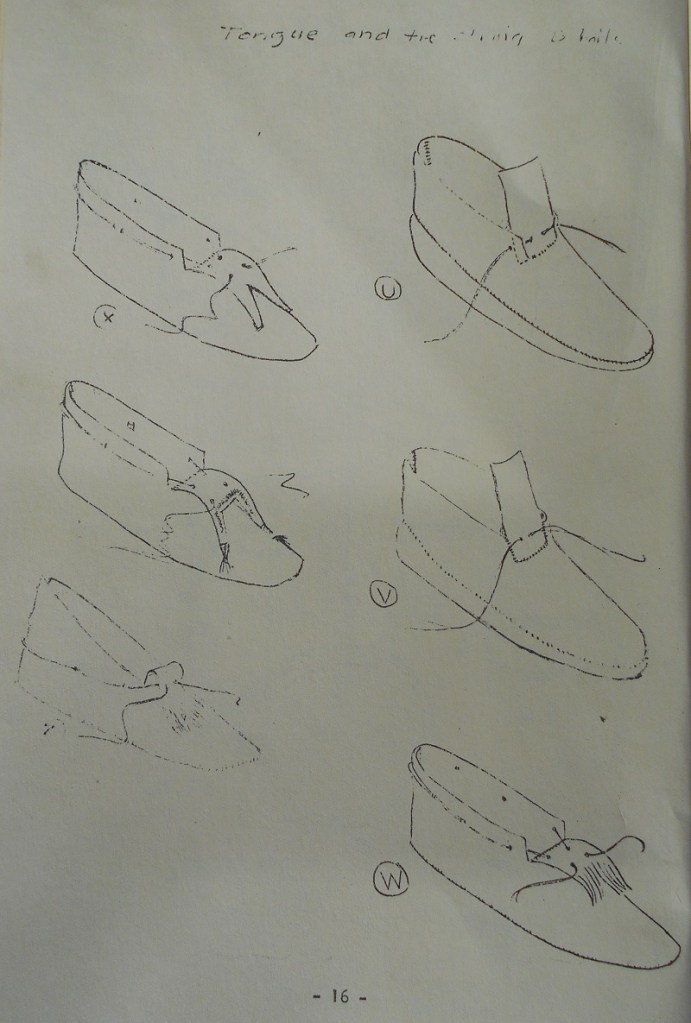
I used this pattern for the upper part of the boot. It is a southern plains style. I did not use the moccasin part of the pattern that covers the foot. I did not stitch the top part of the boot to the bottom part that goes on the foot because I wanted to be able to take the upper part (that covers the shins) off and on. If I was riding through thorny terrain or if it was cold out, I could put the upper part on, making the moccasin a knee-high boot. If it is hot out, I can leave the upper part of the boot off and only wear the bottom high-top moccasin shoe. I made the bottom shoe part so that the high-top moccasin extends under the upper shin guard. The shin guard wraps around and over the bottom shoe. By doing this I have good ankle movement.
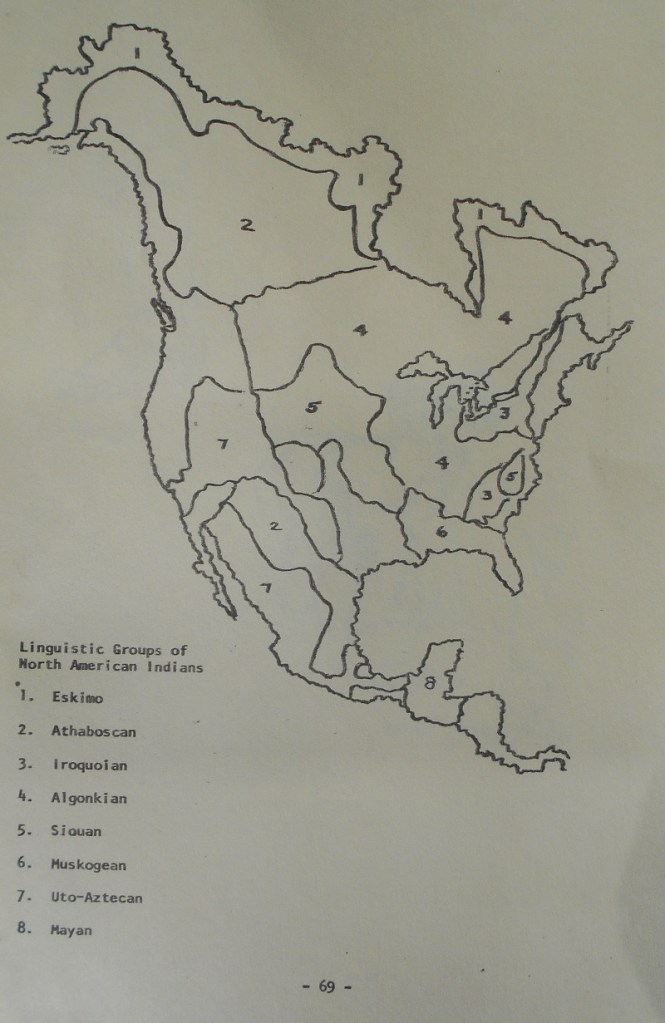
For the moccasins I used two patters from the booklet: Craftmanual of North American Footware by George M. White, 1969


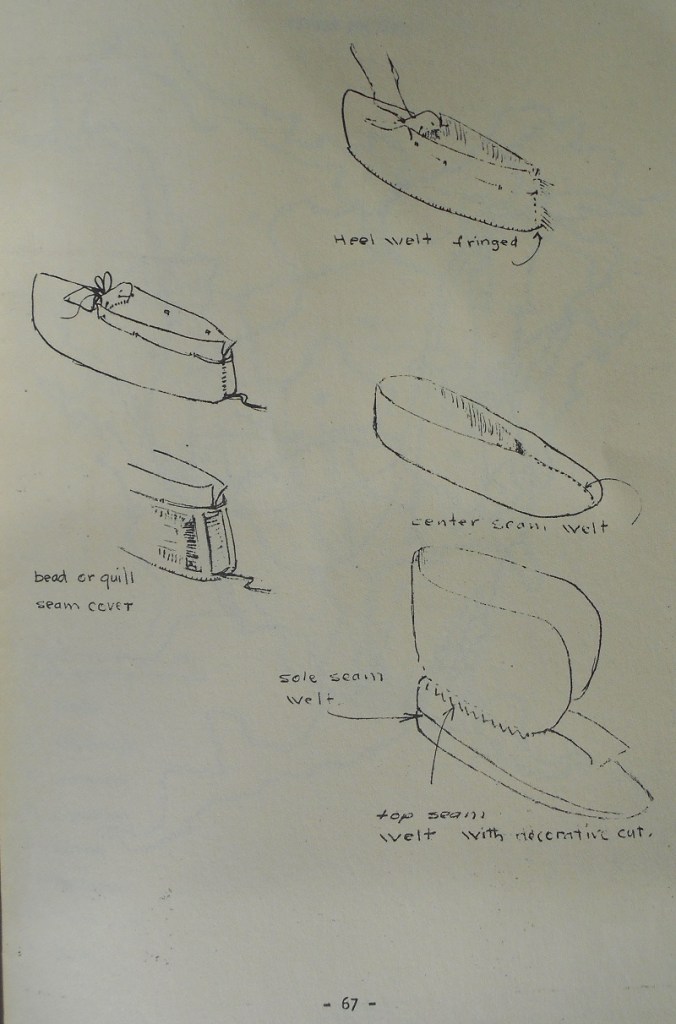
Mukluk
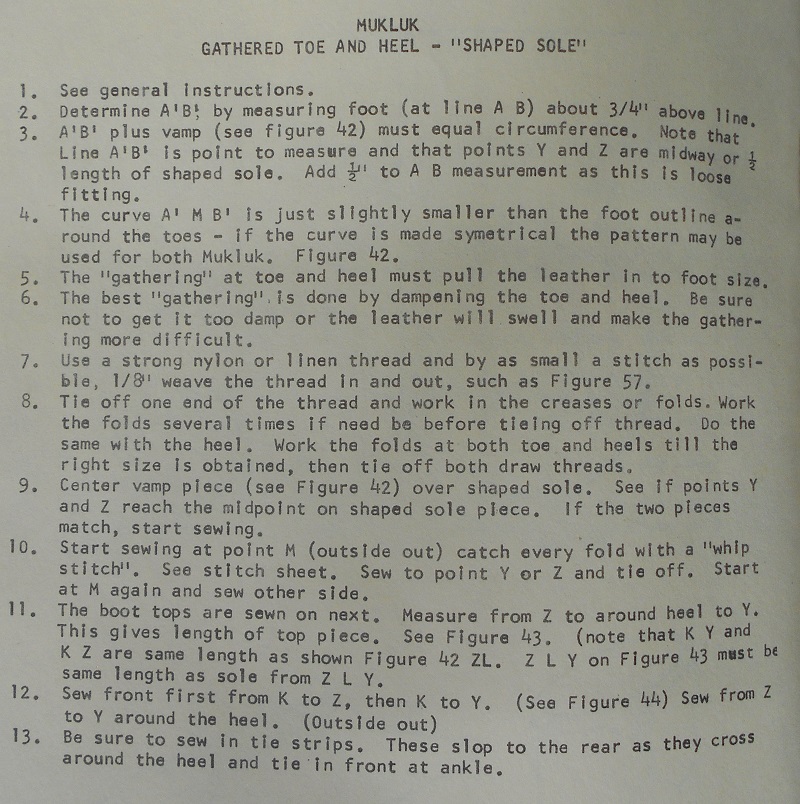
This is the pattern that I used for my winter boot. I made the mukluks extra big so that I could put on three layers of thick wool socks and still have my foot slip into the mukluk.
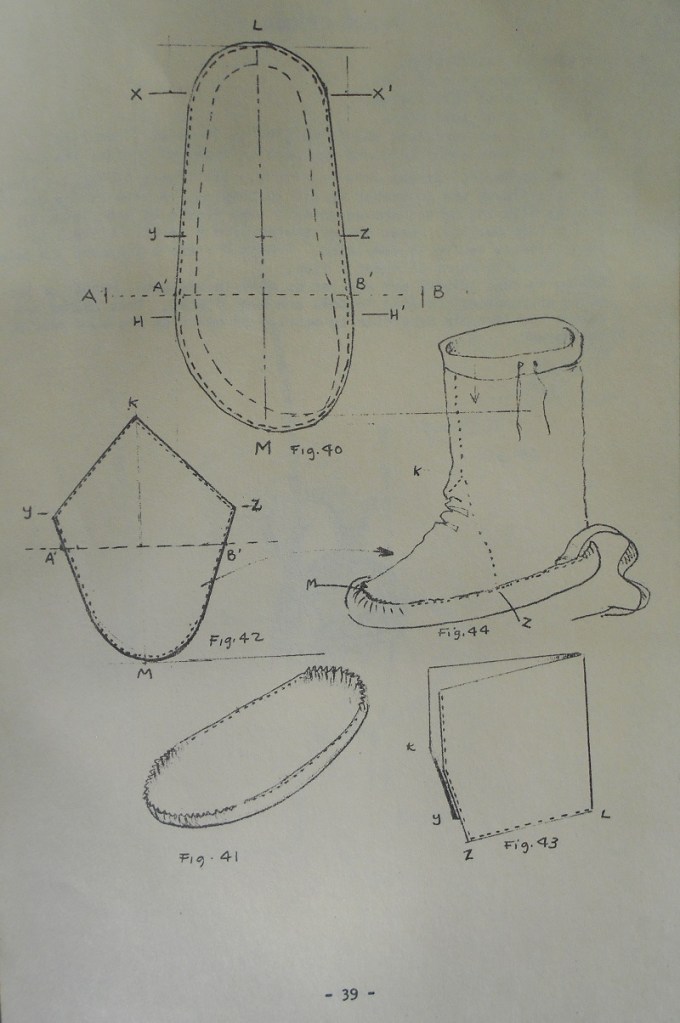
Apache Shaped-Sole 3-Piece

I also used this Apache pattern for the hard soled (rawhide) shoes.

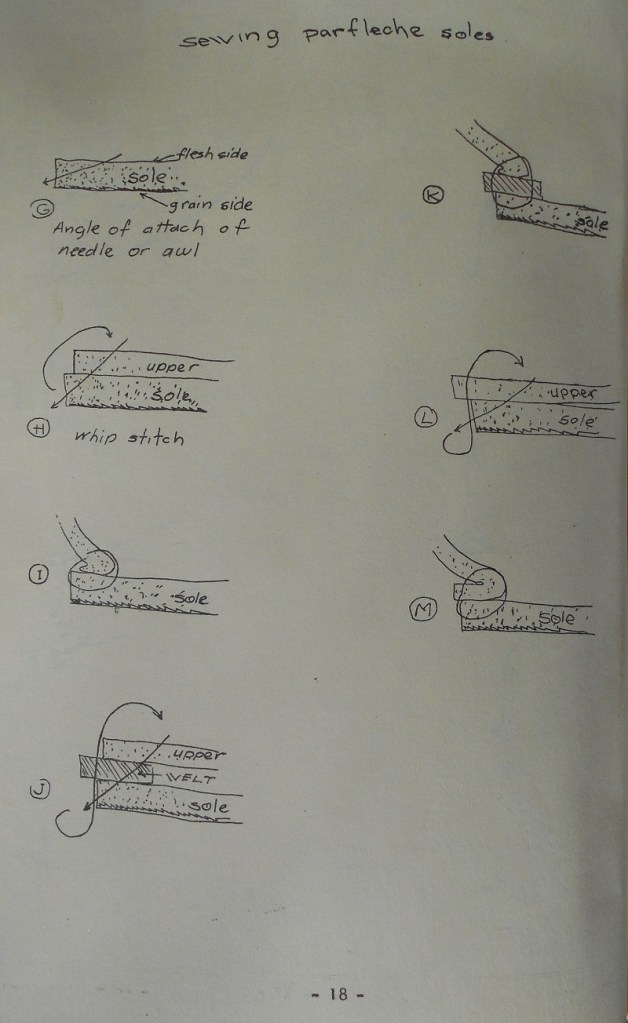
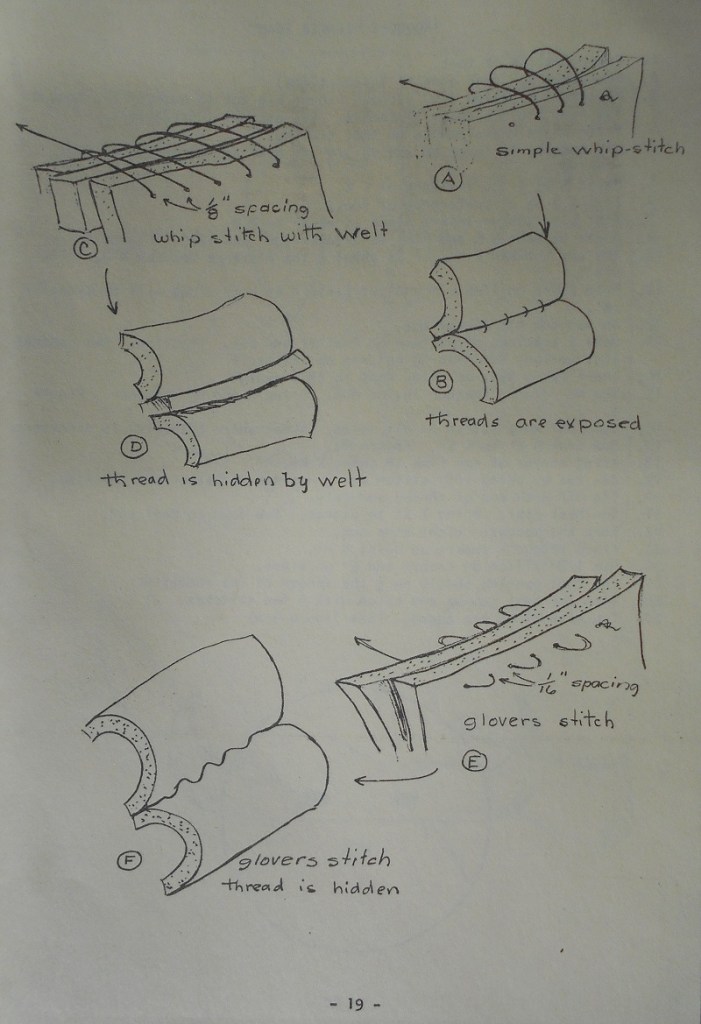
SEWING INSTRUCTIONS
I ignored the sewing instructions of all other publications in favor of the far superior techniques explained in the following link. I adapted these leather sewing instructions for sinew.
The Art of Hand Sewing Leather by Al Stohlman
MOCCASIN CONSTRUCTION
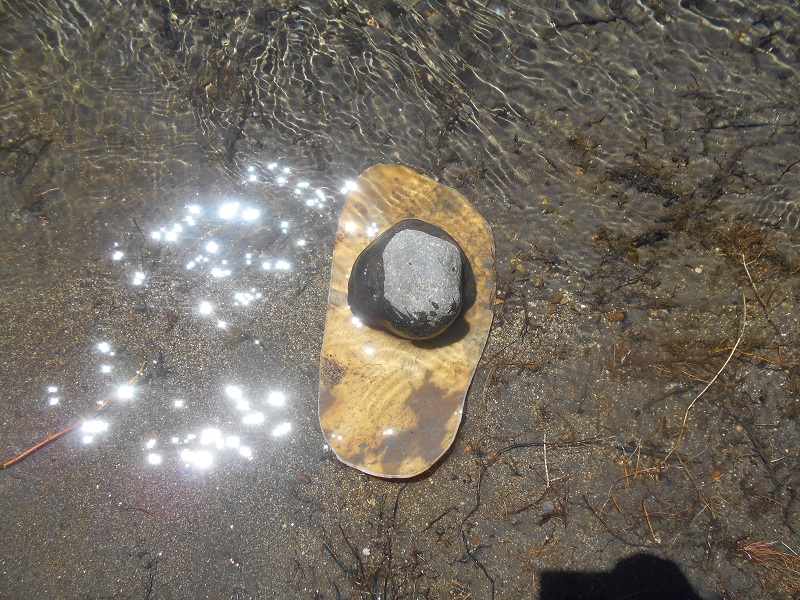
This is a piece of horse rawhide. I had previously soaked a larger section of rawhide, traced my foot pattern and cut it out. Then I stored the foot tracing and it re-hardened when drying. Here I am re-soaking the foot tracing of rawhide to get it soft so that I can punch holes into it with an awl and sew on the vamp-upper part of the moccasin. A stone is used to hold the raw hide sole under water in a river.

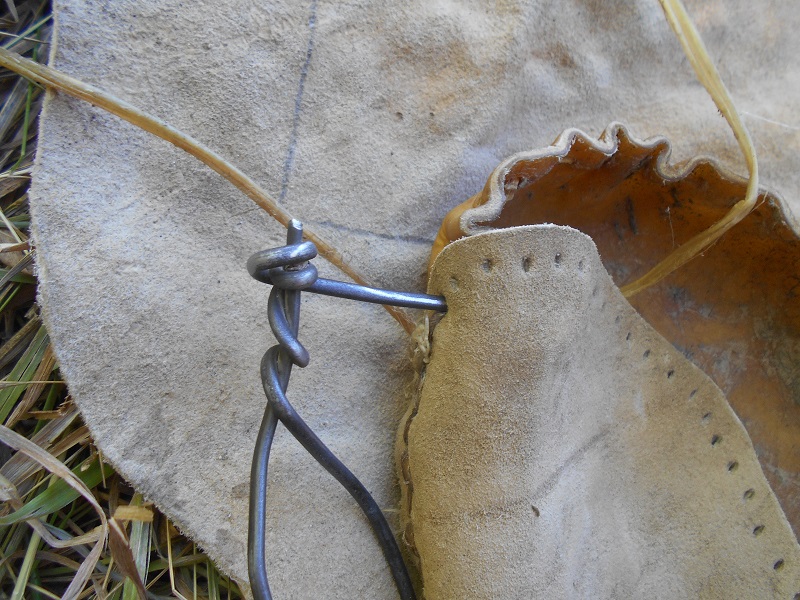
Here I am pre-punching holes in the cow vamp-upper (lighter colored leather to the left) and the soaked softened horse rawhide sole.
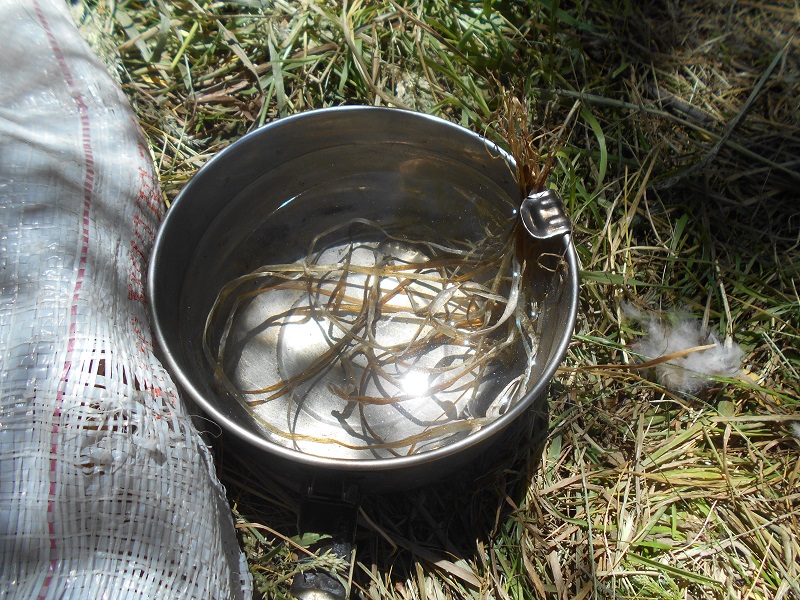
Here I am soaking sinew. I leave the tips out of the water to keep them stiff. This makes them easier to thread through the holes punched by the awl.

This is the soaked sinew. The left side of the sinew strand is lighter in color. This is the part that was soaked under water and is flexible. The tips are a darker color and are dry. The tips will be cut to a chisel point prior to stitching. Think of the stiff tips as built in ¨needles¨ for your thread.
I really like sinew as a sewing material for stitching. It is strong and when it dries it locks the stitching in place very well. It looks nice and maintains some flexibility when dry. You can split it into any thickness that you like.
There are only two downsides to using sinew that I know of. Sometimes animals will chew on your leather and sinew. (In a pinch you can eat your moccasins.) The other negative aspect of using sinew is the length of each strand of sinew can be shorter than what I would prefer at times. It depends on the animal that you harvest the sinew from. The bigger the animal, the longer the strands. I used horse sinew for my moccasins.

I am pre-shaping the sole to my foot by stepping on the center of the sole then running sinew through the pre-punched holes and pulling the soles up snug with the sinew threads so that the soles conform to my foot. I made a sizing mistake with these soles. When I did the original foot pattern, I should have been wearing several pairs of thick wool socks when making the pattern. The rawhide hard sole will shrink when it dries. So it is important to make a rawhide sole oversized so that it fits when the rawhide dries. I made my pattern too small because I was only wearing one pair of socks when making the pattern and shaping the sole.
The hard sole should last longer than a soft sole and break in as you wear it. The hard sole is not comfortable (at least not at first). I have not worn it enough yet to know how it wears in over time. I would plan on wearing several pairs of socks to act as padding between the hard sole and your foot. A hard sole can also be a bit slippery at first too.
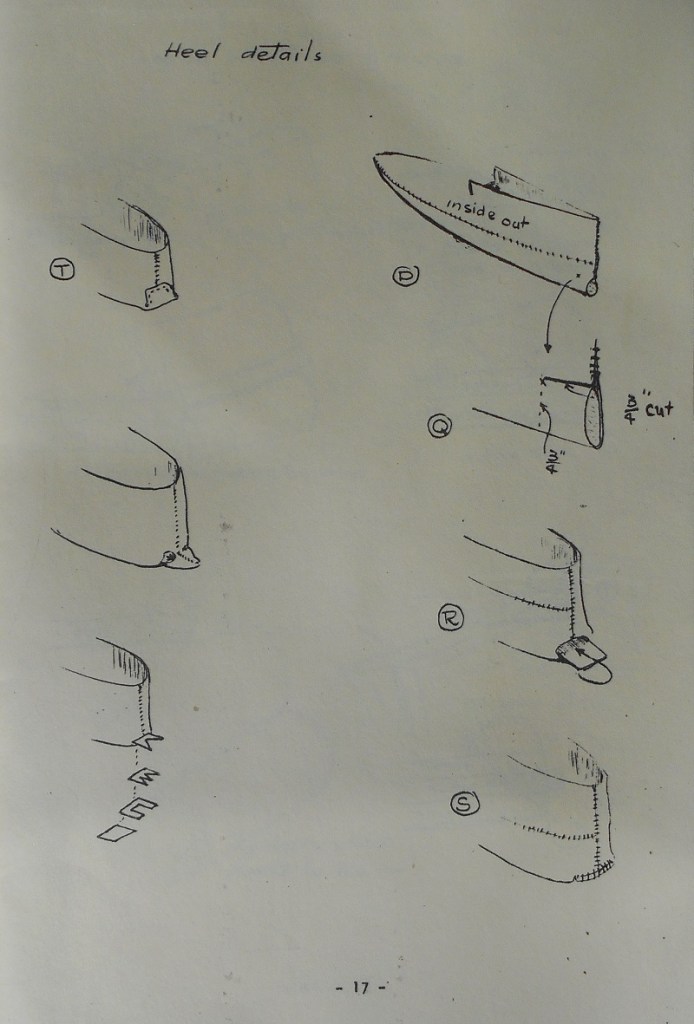
Shaping the heel. Again, I should have been wearing more layers of socks for this part to get a better fit.

The sinew is getting short so I am going to tie it off. If it is wet when tied, the knot will hold better upon drying. I am going to conceal the knot between the layers of leather.
I have tied a knot.
The extra sinew is cut off.

Here I am starting a new strand of sinew. This is my first hole for the new strand. I went back two holes before the knot to start. This overlap between sinew strands makes for a stronger stitching.
I am enlarging the hole to create space to push the thread through. There is one end of this sinew strand on the inside and one on the outside. They will go through the next hole and switch sides once pulled through.
FINISHED MOCCASINS

These are the mukluks with the shin covers underneath. I twisted leather strips to make the cordage that was sewn into the boot seams. The cords were used to wrap and secure the mukluks to the foot.
The mukluk on the left is closer to the traditional pattern. I prefer this style for this design.
The mukluk on the right has the vamp-upper sewn over the sole. I also tried a Baseball Stitch for the upper part of the boot on this mukluk. I do not like this type of stitching. I stitched in the leather tie cord further back on this boot too. I think either location for the cord is fine.

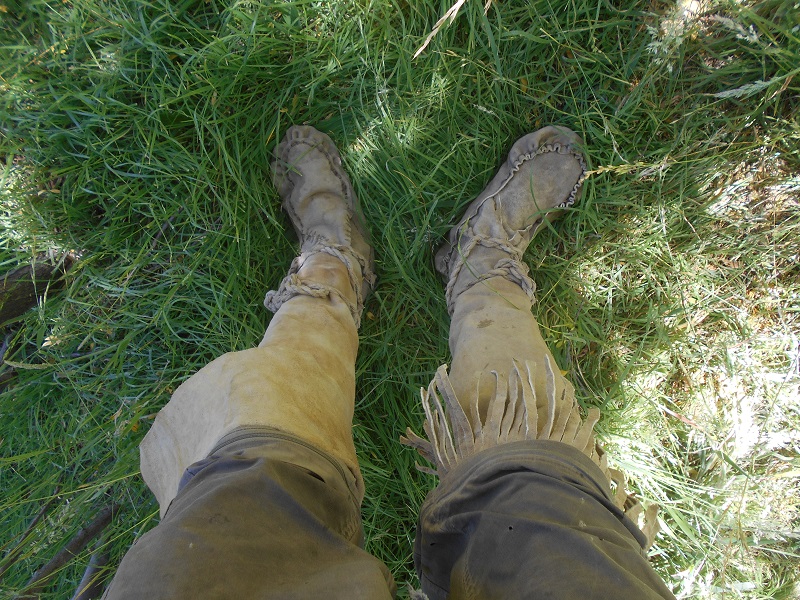
This is what the mukluks look like worn without the shin guards/boot tops.

Here is what the mukluks look like with the shin guards/boot tops over them. The top flap of the shin guard/boot top on the left is just folded over (my preferred style) and the one on the right has been cut into strips to give it a livelier aesthetic.

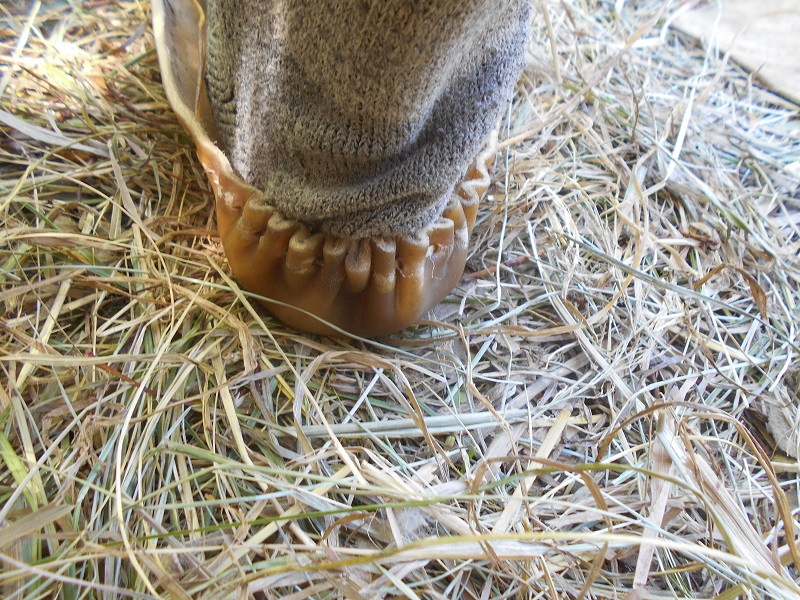
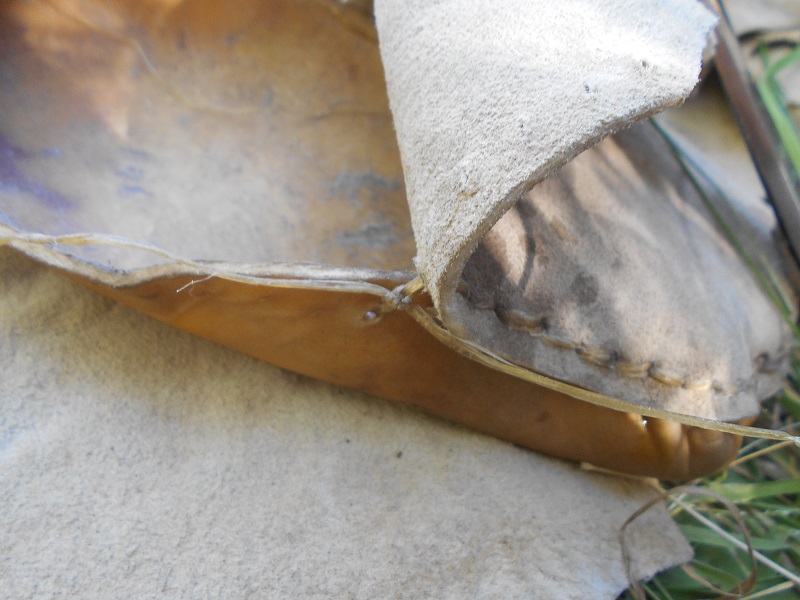
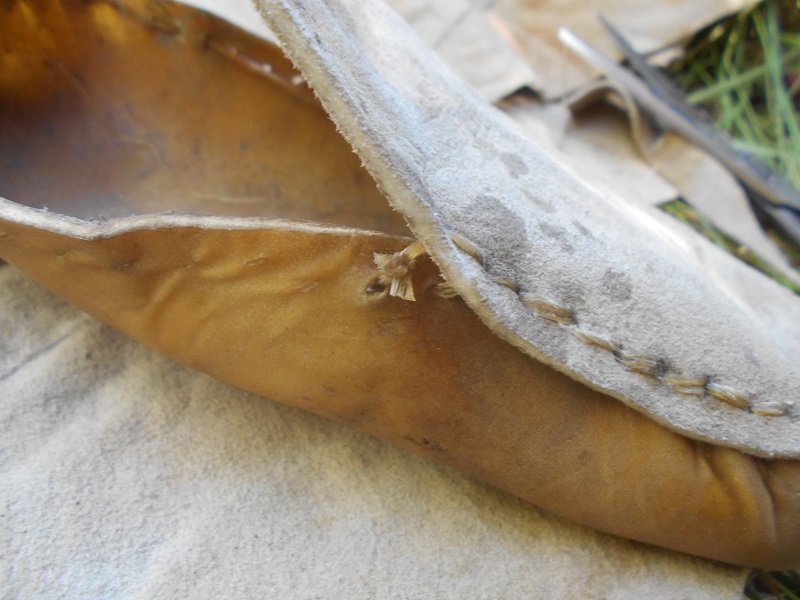
These are the hard-soled high-top Apache-style moccasins. The vamp-upper is cow skin. The hard sole is horse rawhide. In the moccasin patterns that I have seen the sole comes up over the edge of the vamp-upper. In these moccasins I put the vamp-upper over the top of the edge of the sole. I thought that this would shed water and debris better. I prefer my modification for this type of moccasin.

I am wearing the hard-sole moccasins. The shoe on the right was made after the one on the left. I made changes to the pattern to improve the fit.
The shin guards can also be worn over these to make them knee-high boots.
As you noticed I did a lot of experiments, as each moccasin is different. I was trying different things to see what I liked more. It does take a fair bit of adjusting the patterns to get the fit right. Once you get a pattern that you are happy with, you will want to keep it. It takes a lot of work to make a nice fitting pattern. I plan to just add more layers of socks to improve padding and insulation for winter.
Other experiments could involve leaving the hair on the skins used to make moccasins with the hair on the inside for improved insulation. Also, coating the outsides of the moccasins in a grease/animal fat for waterproofing would be another area to explore.
Hopefully this inspires you to make your own footwear.
